Documentation

Platform Overview

What is Flashbuild?

Flashbuild is a powerful no-code API builder that allows users to visually design, build, and deploy APIs without writing code. Using an intuitive drag-and-drop interface, Flashbuild empowers both developers and non-technical users to create robust, scalable, and error-free APIs quickly. It uses modular nodes to represent logic, inputs, external integrations, and output responses—making it simple to build everything from basic forms to complex data workflows.

Why Use Flashbuild?

  1. Faster Development: Build APIs in minutes, not weeks.
  2. Team-Friendly: Ideal for both developers and business users.
  3. Error-Proof Execution: Built-in validation and error handling.
  4. Scalable & Flexible: Easily update, expand, or repurpose workflows.

Key Features

  1. Visual API Workflows: Design API logic using drag-and-drop nodes.
  2. No Code Required: Entirely visual—no coding skills needed.
  3. Modular Nodes: Each node performs a specific function (e.g., Input, Condition, Response).
  4. Real-time Testing: Instantly test your workflows and view logs.
  5. Secure by Design: Enforced validation and error boundaries prevent misconfigurations.

Home Screen Overview

When you log into Flashbuild AI, you’ll land on the Flows Dashboard. This is where you manage all your workflows within an organization and project. Below is a breakdown of each UI element and its purpose

Top Navigation (Org & Project)

  1. Organization Dropdown (Org1)
    Switch or create a new organization to group related projects and teams.
  2. Project Dropdown (Project1)
    Switch or create a new project within the selected organization.

🔍 Top Bar Options

  1. Branch Selector (Top Right)
    Allows you to switch between environments like Staging, Production, etc.
  2. Sort By Dropdown
    Sort your flows by Last Edit Date, Created Date, or Name to quickly locate relevant workflows.

Top Action Buttons (Right Side)

  1. Create New Flow
    Starts a new API workflow canvas.
  2. 🗄️ Add Database Connection
    Lets you connect to a PostgreSQL database to use with Database Query Nodes.
  3. 🧪 Manage Environment Variables
    Define and manage key-value pairs used in various workflows.
  4. 🛠️ Advanced Settings
    Access to additional developer tools and configurations.

Left Sidebar Navigation

  1. Flows
    The main view to manage and create API workflows.
  2. Logs
    View execution logs for all workflows, including input/output data, errors, and debug traces.
  3. Playground
    A testing interface where you can run workflows manually with custom inputs.
  4. Invite User (Bottom Left)
    Add team members to your organization or project to collaborate.

Canvas Overview

The Flashbuild Canvas is the central workspace where you visually design your API workflows by adding, connecting, and configuring nodes. It offers a seamless experience for both developers and business users through a clean drag-and-drop interface and intuitive controls.

Flashbuild Node Reference

Below is the documentation for each of the supported nodes visible in your UI. These nodes are used to design API workflows in a modular, visual format.

Input Node

Purpose: Captures input data from the incoming request or the previous node.

Use Case: Use this to collect fields like name, email, or message from a webhook call.

Configuration:

  1. Define field names and types (e.g., string, number, boolean).
  2. Mark fields as required if validation is needed.

Custom Code Node

Purpose: Executes custom JavaScript logic.

Use Case: Use when you need to process data, apply conditional logic, or transform values in ways not supported by default nodes.

Configuration:

  1. Write JavaScript inside the node editor.
  2. Access inputs using “@”

Sub Flow Connection

Purpose: Allows one flow to call another as a sub-process.

Use Case: Reuse logic across multiple workflows or break complex flows into modular parts.

Configuration:

  1. Select an existing published sub-flow.
  2. Map input/output values between parent and sub-flows.

LLM Node

Purpose: Integrates with a built-in Large Language Model (LLM) for text generation or natural language tasks.

Use Case: Use this to generate summaries, replies, or extract information from text prompts.

Configuration:

  1. Enter the system prompt or instructions.
  2. Bind input variables dynamically from previous nodes.
  3. Use the output as part of the conversation or response.

DB Operation Node

Purpose: Performs actions on your database (e.g., fetch, insert, update).

Use Case: Read or modify structured data during a flow execution.

Configuration:

  1. Select the DB connection.
  2. Choose operation type (SELECT, INSERT, etc.).
  3. Map parameters with dynamic variables.

Data Formatting Node

Purpose: Transforms or formats input data (e.g., string manipulation, date formatting).

Use Case: Prepare data for storage, external APIs, or response formatting.

Configuration:

  1. Choose transformation type (e.g., join, split, trim, date formatting).
  2. Apply to specific input fields.

Decision Node

Purpose: Creates branching logic based on conditions.

Use Case: Use this to route flow based on values (e.g., “If status is success, do X; else do Y”).

Configuration:

  1. Add multiple branches with condition expressions.
  2. Each branch can connect to a separate node path.

Vector DB Node

Purpose: Interfaces with a vector database for semantic search and similarity matching.

Use Case: Use this for AI use cases like embedding search, RAG (Retrieval-Augmented Generation), or content clustering.

Configuration:

  1. Provide input text and embedding model.
  2. Query against stored vectors.
  3. Use returned results in downstream logic

API Call Node

Purpose: Calls external APIs using RESTful HTTP methods.

Use Case: Integrate third-party services (e.g., payment, CRM, analytics, weather APIs).

Configuration:

  1. Set URL, method (GET, POST, etc.), headers, and payload.
  2. Use dynamic variables in URL and body.
  3. Handle API responses as downstream inputs.

Media Storage Node

Purpose: Uploads or retrieves files like images, documents, or audio.

Use Case: Use this to store user-uploaded content or serve static files from flows.

Configuration:

  1. Set operation (upload/download).
  2. Bind file input or generate URLs.
  3. Optionally tag or organize by folder.

Logs Screen Overview

The Logs screen in Flashbuild provides a detailed history of workflow executions, making it easy to debug, trace issues, and understand how data flows through each node

Views in Logs

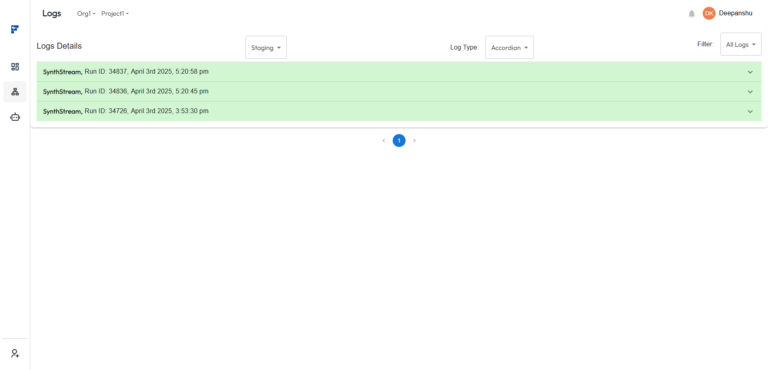
Flashbuild supports two log views to suit different use cases:

1. Flow View

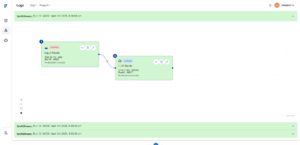
  • Visual representation of the executed flow. Each node is color-coded to reflect its execution status:

    1. ✅ Green – Node executed successfully.

    2. ❌ Red – Node encountered an error.

    3. ⏭️ Purple-Blue – Node was not executed (due to branch conditions or earlier failures).

  • Helps visually trace failures and understand flow paths.

2. Accordion View

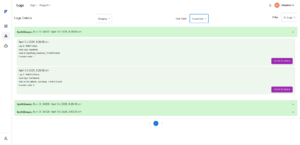
  • Log data shown as expandable panels.

    Each node displays:

    1. Log ID

    2. Execution time

    3. Node Type

    4. Node ID

    Execution Order
    (represents the sequence in which the node was triggered)

  • Users can click “View Details” to expand the node’s execution record.
  •  

3. Input & Output Viewer

  1. On clicking View Details in Accordion View:

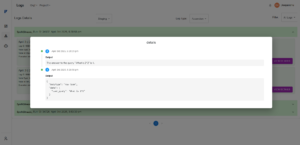
    • See the exact input data that entered the node.
    • See the output response or result from the node.
    • Helps validate logic and debug failures by reviewing real data in and out of each node.

4. Filters & Controls

You can use the following filters to refine your log data:

  1. Branch Selector: Choose between environments like Staging, Master, etc.
  2. Log Type:
    Flow – View logs in visual flow format.
    Accordion – View logs as expandable detailed records.
  3. Log Filter:

    All Logs – Show both successful and failed logs.

    - Failed Logs – Show only logs where one or more nodes failed.

    - Success Logs – Show only successful runs.
    1.  

Use Cases

  1. Debug Flows – Instantly identify where a failure occurred.
  2. Test Changes – Verify expected outputs before publishing.
  3. Audit Executions – Track input/output of nodes over time for compliance or analytics.
  4.  

    AI-POWERED API BUILDER rocket

    Join the waiting list for early access